
The fence is composed of:
- 4X4 cedar posts
- 1X cedar boards for the vertical slats
- 2X4 cedar for the three horizontal pieces
- 3/4"x3/4" trim pieces to attach the slats to the 2X4s on either side
The first step to making this fence is putting in posts:
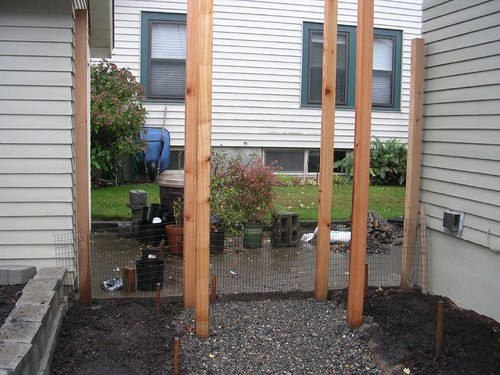
I used a technique for setting the posts that I found on the Prowell Woodworks website. Basicallly, you set the post bottom on a few inches of gravel and use pea gravel around the post for the first two-thirds of the hole. This makes it much easier to plumb the post (instead of using stakes). The posts that are meant to hold up the gate are set in full concrete.
I set the posts with plenty of extra length on top so that I could cut it off as needed. I think that I used 10 foot posts for the short posts and 12 foot for the long posts, putting them about 3ft in the ground.
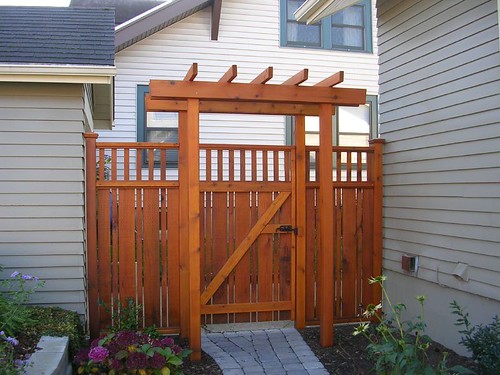
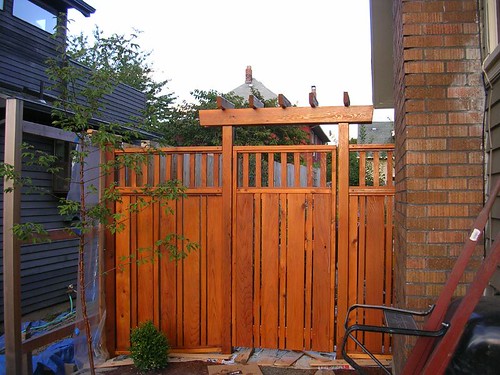
In compliance with local regulations, the fence is exactly 6' tall, with the gap in the top section about 1', and the remainder of the height in the bottom section. The arbor and the post caps poke up above 6'.
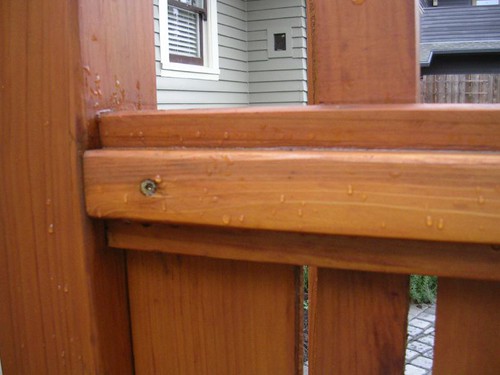
The main fence panels are created by cutting and attaching 2X4s to the posts. I used stainless steel screws for this to prevent bleeding when the cedar got wet.
I made the top two horizontal pieces level and let the bottom one follow the contour of the ground, with an inch and a half or so of clearance.
To put in the panels, I measured and cut one side (top and bottom) of the 3/4" trim piece and finish nailed it to the 2X4s with stainless steel nails. Then it was time to install the vertical slats. The slats had to be ripped, and then cross cut to size, one by one, and this was time consuming. They were then nailed diagonally into the trim piece and down into the 2X4 below or above.
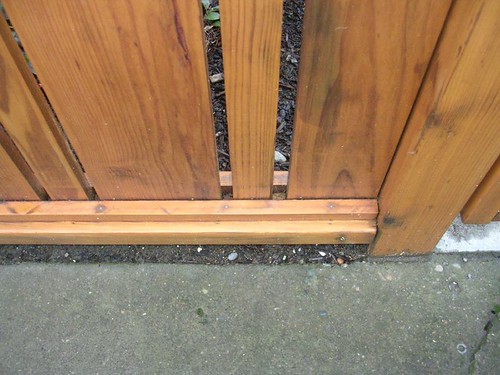
The basic pattern of the slats was one 1X6, a 1/2" space, and a 1 7/8" slat (the approximate width of a 1X6 ripped into 3 pieces), then a 1/2 inch space. Before starting a small section, I planned on starting and ending on a wide piece and figured how much I needed to cut off the first and last piece (waiting to cut the last piece until I got there).

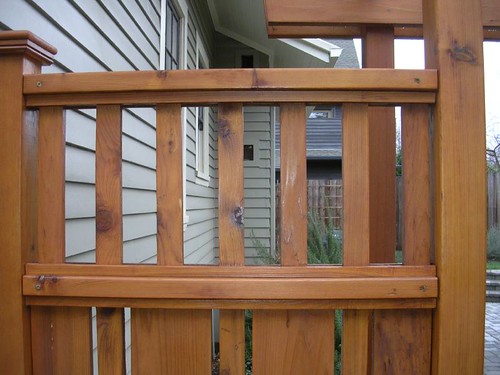
The top section was assembled just like the bottom one. The slats are all the same width as the narrow ones on the bottom and go directly above the narrow ones on the bottom and centered above the wide slats on the bottom.
When it came to the gate, that's when things got interesting. It took me quite awhile to figure out how the gate was done on the other fence in the neighborhood that I copied. The gate is framed on three sides (top, left and right) with 2X4 ripped so that it is just 21/2"wide instead of 31/2" wide. This is thick enough to hold 2X4 cross pieces plus the slats so they are flush. The top horizontal piece is the full width of the gate, the verticals are attached to it with stainless steel screws set from the top.
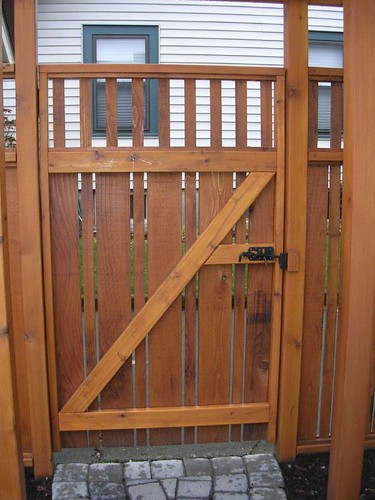
The first step in gate assembly was to create that frame. Then I installed the 2X4 support pieces by screwing them in from the sides. Then it was time to flip it over and nail the slats in the bottom section onto the 2X4s with wide head, flat nails. The top gate section is assembled like the main sections, but using mini, 1/2" wide trim pieces.
Regarding gate width: one of my gate openings was 31/2', the other 3'. I recommend leaving about 1/4" gap on either side of the gate (so make the gate 1/2" shorter than gap). Initially, I only left 1/8" on either side and there was enough sag that the gate wouldn't close. I used fairly standard steel hinges pre-painted black. These were hard to find for some reason--I had to go to a hardware store geared towards contractors. I actually mortised out the hinges with a router so that I could make the gap a little wider. This seemed like overkill, but it made the gate easier to install.

The arbors were a nice touch. They helped stabilize the gate and make for a nice gateway. I made one arbor that encompassed just the fence itself and another that used two additional support posts. I used 2X10s for the wide pieces and 2X4s on top. I sawed the ends of the top cross pieces at about a 5 degree angle or so so that they are slightly longer on top. I assembled everything with screws.

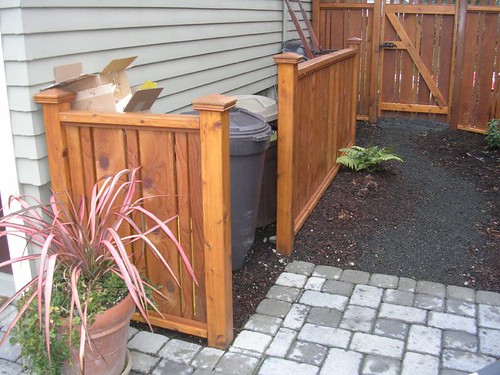
The fence sections around the garbage cans just eliminated the top section and were cut to be about 3 1/2' high.
To preserve the rich color of the cedar, I sanded the smooth surfaces of the fence, brushed the rough surfaces (one side of the slats), and applied 3 coats of Sikkens Cetol 1 in the natural color. The color is a little on the orange side, but looks like wet cedar. I might try natural light if I had to do it again. Painting the fence is a pain in the rear, but it does look sharp afterwards.
20 comments:
Just found your blog and the craftsman fence looks great. Where did you buy your wood? I'm located in PDX as well. Thanks!
Beautiful fence... I noticed you said you used special screws, but what about for the gate hardware? Those look like standard screws, won't they bleed through cedar?
Beautiful! I found your post while Googling "Craftsman fence" :) You've done such a fantastic job. My husband and I have just moved into a home that really needs a good dose of character. We're hoping to add in some Craftsman detailing. Due to the large DROP (and I do mean drop) in our backyard grading, a fence is first on our list of things to do. I'll be sure to show him your great pics!!
Jacci in Ohio
I saw your fence in some search for fencing, do you do this professionally? I have a quarter acre plot to fence in - is this type of fence installation wind friendly- my current fence is paying on the ground in pieces because of the wind... email me if you do this professionally I'd like a quote. cagirlinportland@yahoo
What a beautiful gate! I hope I have the skills to pull off something so nice as yours. Im looking to do something similar, but with craftsman river rock posts on either side of the gate.
I love the period correct craftsman fence. Alot of work but well worth it.
This is such a beautiful fence. You are extremely talented! I'd like to do something similar with our new fence. Any advice on things you wish you knew or would do different next time? Is water ever a problem with the tiny wells between the slats on the 2x4 at the bottom? I noticed that you sanded before stain/sealing...did you also sand the posts and 2x4s, they look so finished! Also I don't see a single nail hole/ except for the screws at the corner...however did you do that! Your amazing.
You inspired us! We're finishing one in Freeport, Maine today.
You have design it very beautifully. This seems very nice. I love these all pictures.
Privacy Picket Fence
This is an excellent blog! They fence builders in Calgary would enjoy reading this. Thank you!
Shop eBay! Visit eBay for great deals in Livestock Fencing and Supplies.
Garden Fence
vinyl tongue groove 4 foot high fence gate fits a 48 inch wide opening. Vinyl Fence; Wrought Iron Fence; Fencing Information Model # RPF100 – 4′ Foot High Wrought Iron Residential Fence.
black vinyl chain link fence
We have a bungalow in Colorado and found your blog just in time. My husband put up an 8 foot fence around our backyard, like yours. We've gotten a lot of compliments from our neighbors. My husband didn't sand the cedar, so I hope there aren't any problems in weathering. Thank you for sharing this great design.
This is a very amazing post. It is also helpful for us. Thank's for sharing your article.
wholesale fence gate hardware
fence gate hardware manufacturer
fence gate hardware
Cedar is a mainstream fence material and seemingly the best wood for security wall. With a tight, straight grain and less bunches, also its alluring red shade and charming aroma, cedar is a steady, strong wood that opposes twisting, breaking, and contracting. The regular oils and acids inside the wood additionally deflect wood-annihilating bugs. Cedar wall are reasonable and the boards can be tweaked to make different looks that supplement the style of your home. You can call today if you want this.
Based on fencing specialists, instead of treated wood, cedar tends to spoil following quite a long while of being in the dirt. To check this possible danger, you can introduce the fence in a substantial base. Cedar wall on the Colorado Front Range likewise require periodic support, for example, board substitution and applying sealant yearly, however they rush to introduce and simple to fix. Additionally, on the grounds that cedar is a well known fence material that never appears to become dated, it is not difficult to gain for substitutions.
Cedar was recommended by BF fence company Greeley for our home and we like it so much better than our last fence.
Such a nice wonderful Blog!
If you guys are searching for Residential Painting Company just visit to my website.
We provide Professional Painting Services in Coatesville, PA, United States.
Thanks for sharing these ideas about using marble in interior design.
home renovation Ireland
kitchen renovation Dublin
bathroom renovation contractors Ireland
house renovation services
renovation ideas for Irish homes
eco-friendly renovation Ireland
old house renovation Dublin
renovation cost estimator Ireland
modern home renovation trends
renovation contractors near me Ireland
This article was incredibly insightful. I truly appreciate the clarity and depth of information you’ve provided. Thank you for sharing!
Okoume Marine Plywood Suppliers
Post a Comment